AD7858/AD7858L
REV. B
–19–
Table VI. Power Management Options
PMGT1 PMGT0 SLEEP
Bit Bit Pin Comment
000Full Power-Down if Not
Calibrating or Converting
(Default Condition
After Power-On)
001Normal Operation
01XNormal Operation
(Independent of the SLEEP Pin)
10XFull Power-Down
11XPartial Power-Down if Not
Converting
A typical connection diagram for a low power application is
shown in Figure 21 (AD7858L is the low power version of the
AD7858).
AUTO POWER
DOWN AFTER
CONVERSION
AUTO CAL
ON
POWER-UP
OPTIONAL
EXTERNAL
REFERENCE
1.8MHz
OSCILLATOR
MASTER
CLOCK
INPUT
0.1F
0.1F10F
ANALOG
SUPPLY
+3V
0V TO 2.5V
INPUT
0.1F
0.01F
0.01F
0.1F
INTERNAL
REFERENCE
100kHz
PULSE
GENERATOR
CONVERSION
START INPUT
SERIAL CLOCK
INPUT
SERIAL DATA
OUTPUT
CLKIN
SCLK
CONVST
SYNC
DIN
DOUT
DGND
AGND
CAL
SLEEP
C
REF2
C
REF1
AIN()
AIN(+)
AV
DD
DV
DD
AD7858/
AD7858L
LOW
POWER
C/P
CURRENT,
I = 1.5mA
TYP
SERIAL DATA
INPUT
REF
IN
/REF
OUT
REF192
Figure 21. Typical Low Power Circuit
POWER-UP TIMES
Using an External Reference
When the AD7858 is powered up, the part is powered up from
one of two conditions. First, when the power supplies are ini-
tially powered up and, secondly, when the part is powered up
from either a hardware or software power-down (see last section).
When AV
DD
and DV
DD
are powered up, the AD7858 should be
left idle for approximately 32 ms (4 MHz CLK) to allow for the
autocalibration if a 10 nF cap is placed on the CAL pin, (see
Calibration section). During power-up the functionality of the
SLEEP pin is disabled, i.e., the part will not power down until
the end of the calibration if SLEEP is tied logic low. The auto-
calibration on power-up can be disabled if the CAL pin is tied to
a logic high. If the autocalibration is disabled, then the user must
take into account the time required by the AD7858 to power-up
before a self-calibration is carried out. This power-up time is the
time taken for the AD7858 to power up when power is first
applied (300 µs) typ) or the time it takes the external reference
to settle to the 12-bit levelwhichever is the longer.
The AD7858 powers up from a full hardware or software
power-down in 5 µs typ. This limits the throughput which the
part is capable of to 104 kSPS for the AD7858 operating with a
4 MHz CLK and 66 kSPS for the AD7858L with a 1.8 MHz
CLK when powering down between conversions. Figure 22
shows how power-down between conversions is implemented
using the CONVST pin. The user first selects the power-down
between conversions option by using the SLEEP pin and the
power management bits, PMGT1 and PMGT0, in the control
register, (see last section). In this mode the AD7858 automati-
cally enters a full power-down at the end of a conversion, i.e.,
when BUSY goes low. The falling edge of the next CONVST
pulse causes the part to power up. Assuming the external refer-
ence is left powered up, the AD7858 should be ready for normal
operation 5 µs after this falling edge. The rising edge of CONVST
initiates a conversion so the CONVST pulse should be at least
5 µs wide. The part automatically powers down on completion
of the conversion.
5s
t
CONVERT
POWER-UP
TIME
NORMAL
OPERATION
FULL
POWER-DOWN
POWER-UP
TIME
START CONVERSION ON RISING EDGE
POWER-UP ON FALLING EDGE
CONVST
BUSY
Figure 22. Power-Up Timing When Using
CONVST
Pin
NOTE: Where the software CONVST is used or automatic full
power-down, the part must be powered up in software with an
extra write setting PMGT1 = 0 and PMGT0 = 1 before a con-
version is initiated in the next write. Automatic partial power-
down after a calibration is not possible; the part must be
powered down manually. If software calibrations are to be used
when operating in the partial power-down mode, then three
separate writes are required. The first initiates the type of cali-
bration required, the second write powers the part down into
partial power-down mode, while the third write powers the part
up again before the next calibration command is issued.
Using the Internal (On-Chip) Reference
As in the case of an external reference, the AD7858 can power-
up from one of two conditions, power-up after the supplies are
connected or power-up from hardware/software power-down.
When using the on-chip reference and powering up when AV
DD
and DV
DD
are first connected, it is recommended that the power-
up calibration mode be disabled as explained above. When using
the on-chip reference, the power-up time is effectively the time
it takes to charge up the external capacitor on the REF
IN
/REF
OUT
pin. This time is given by the equation:
t
UP
= 9 × R × C
where R 150 kand C = external capacitor.
REV. B
–20–
AD7858/AD7858L
The recommended value of the external capacitor is 100 nF;
this gives a power-up time of approximately 135 ms before a
calibration is initiated and normal operation should commence.
When C
REF
is fully charged, the power-up time from a hardware
or software power-down reduces to 5 µs. This is because an
internal switch opens to provide a high impedance discharge
path for the reference capacitor during power-downsee Figure
23. An added advantage of the low charge leakage from the
reference capacitor during power-down is that even though the
reference is being powered down between conversions, the
reference capacitor holds the reference voltage to within
0.5 LSBs with throughput rates of 100 samples/second and
over with a full power-down between conversions. A high input
impedance op amp like the AD707 should be used to buffer this
reference capacitor if it is being used externally. Note, if the
AD7858 is left in its power-down state for more than 100 ms,
the charge on C
REF
will start to leak away and the power-up
time will increase. If this long power-up time is a problem, the
user can use a partial power-down for the last conversion so the
reference remains powered up.
AD7858
REF
IN
/REF
OUT
EXTERNAL
CAPACITOR
SWITCH OPENS
DURING POWER-DOWN
BUF
ON-CHIP
REFERENCE
TO OTHER
CIRCUITRY
Figure 23. On-Chip Reference During Power-Down
POWER VS. THROUGHPUT RATE
The main advantage of a full power-down after a conversion is
that it significantly reduces the power consumption of the part
at lower throughput rates. When using this mode of operation,
the AD7858 is only powered up for the duration of the conver-
sion. If the power-up time of the AD7858 is taken to be 5 µs
and it is assumed that the current during power-up is 4 mA typ,
then power consumption as a function of throughput can easily
be calculated. The AD7858 has a conversion time of 4.6 µs
with a 4 MHz external clock. This means the AD7858 con-
sumes 4 mA typ, (or 12 mW typ V
DD
= 3 V) for 9.6 µs in every
conversion cycle if the device is powered down at the end of a
conversion. If the throughput rate is 1 kSPS, the cycle time is
1000 µs and the average power dissipated during each cycle is
(9.6/1000) × (12 mW) = 115 µW. The graph, Figure 24, shows
the power consumption of the AD7858 as a function of through-
put. Table VII lists the power consumption for various through-
put rates.
Table VII. Power Consumption vs. Throughput
Throughput Rate Power
1 kSPS 115 µW
10 kSPS 1.15 mW
POWER mW
0.01
1
10
THROUGHPUT kSPS
0
10 20 30 40 50
0.1
515253545
AD7858 (4MHz CLK)
AD7858L (1.8MHz CLK)
Figure 24. Power vs. Throughput Rate
CALIBRATION SECTION
Calibration Overview
The automatic calibration that is performed on power-up en-
sures that the calibration options covered in this section will not
be required in a significant amount of applications. The user
will not have to initiate a calibration unless the operating condi-
tions change (CLKIN frequency, analog input mode, reference
voltage, temperature, and supply voltages). The AD7858/
AD7858L have a number of calibration features that may be
required in some applications and there are a number of advan-
tages in performing these different types of calibration. First,
the internal errors in the ADC can be reduced significantly to
give superior dc performance, and secondly, system offset and
gain errors can be removed. This allows the user to remove
reference errors (whether it be internal or external reference)
and to make use of the full dynamic range of the AD7858/
AD7858L by adjusting the analog input range of the part for a
specific system.
There are two main calibration modes on the AD7858/AD7858L,
self-calibration and system calibration. There are various op-
tions in both self-calibration and system calibration as outlined
previously in Table IV. All the calibration functions can be
initiated by pulsing the CAL pin or by writing to the control
register and setting the STCAL bit to one. The timing diagrams
that follow involve using the CAL pin.
The duration of each of the different types of calibrations is
given in Table VIII for the AD7858 with a 4 MHz master clock.
These calibration times are master clock dependent. Therefore,
the calibrating times for the AD7858L (CLKIN = 1.8 MHz)
will be longer than those quoted in Table VIII.
Table VIII. Calibration Times (AD7858 with 4 MHz CLKIN)
Type of Self- or
System Calibration Time
Full 31.25 ms
Offset + Gain 6.94 ms
Offset 3.47 ms
Gain 3.47 ms
AD7858/AD7858L
REV. B
–21–
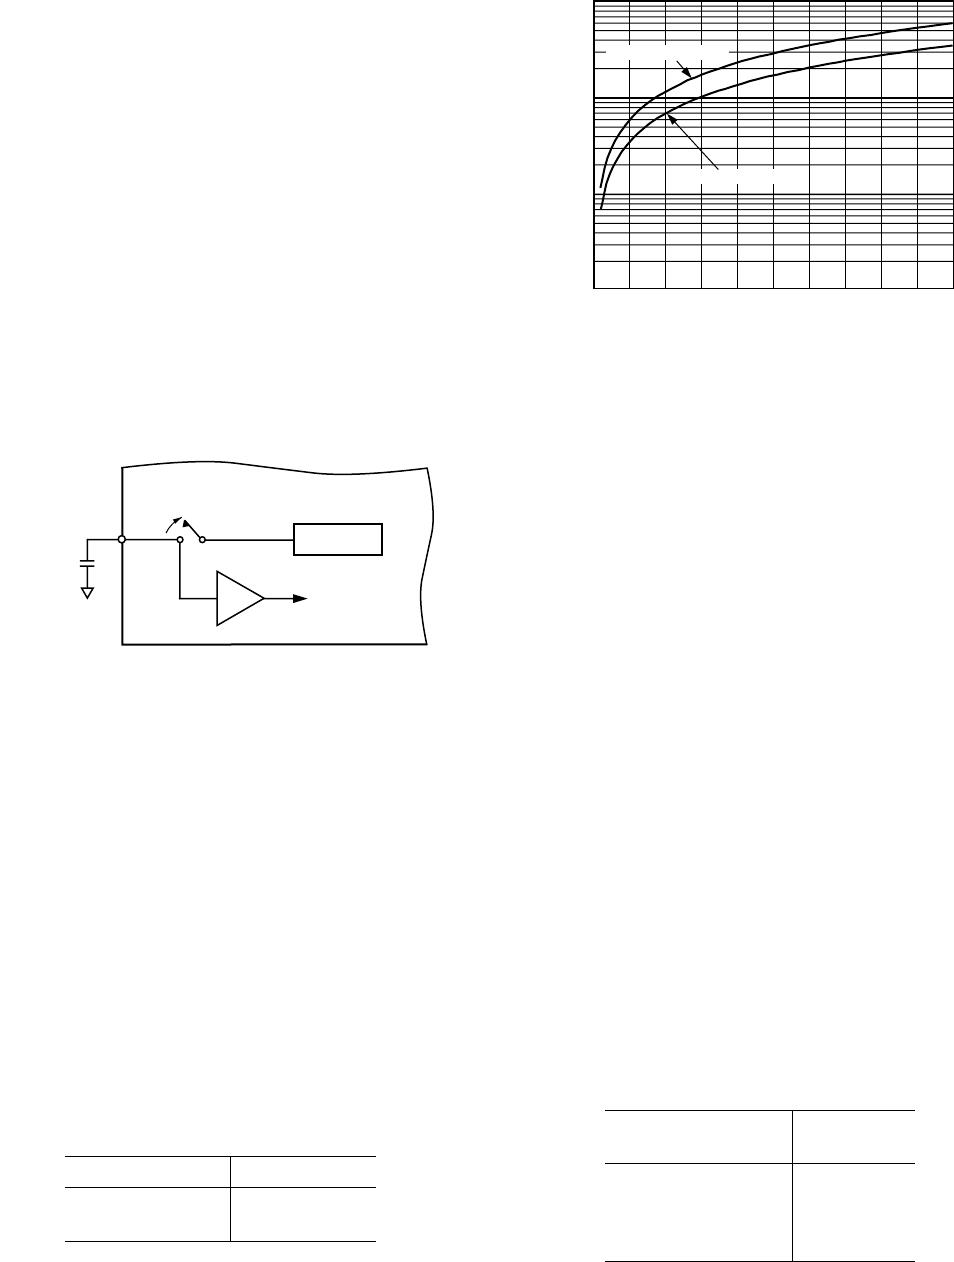
Automatic Calibration on Power-On
The CAL pin has a 0.15 µA pull-up current source connected
to it internally to allow for an automatic full self-calibration on
power-on. A full self-calibration will be initiated on power-on if
a capacitor is connected from the CAL pin to DGND. The
internal current source connected to the CAL pin charges up
the external capacitor and the time required to charge the exter-
nal capacitor will depend on the size of the capacitor itself. This
time should be large enough to ensure that the internal refer-
ence is settled before the calibration is performed. A 33 nF
capacitor is sufficient to ensure that the internal reference has
settled (see Power-Up Times) before a calibration is initiated
taking into account trigger level and current source variations
on the CAL pin. However, if an external reference is being
used, this reference must have stabilized before the automatic
calibration is initiated (a larger capacitor on the CAL pin
should be used if the external reference has not settled when the
autocalibration is initiated). Once the capacitor on the CAL pin
has charged, the calibration will be performed which will take
32 ms (4 MHz CLKIN). Therefore the autocalibration should
be complete before operating the part. After calibration, the
part is accurate to the 12-bit level and the specifications quoted
on the data sheet apply. There will be no need to perform
another calibration unless the operating conditions change or
unless a system calibration is required.
Self-Calibration Description
There are four different calibration options within the self-
calibration mode. First, there is a full self-calibration where the
DAC, internal gain, and internal offset errors are calibrated out.
Then, there is the (Gain + Offset) self-calibration which cali-
brates out the internal gain error and then the internal offset
errors. The internal DAC is not calibrated here. Finally, there
are the self-offset and self-gain calibrations which calibrate out
the internal offset errors and the internal gain errors respectively.
The internal capacitor DAC is calibrated by trimming each of
the capacitors in the DAC. It is the ratio of these capacitors to
each other that is critical, and so the calibration algorithm en-
sures that this ratio is at a specific value by the end of the cali-
bration routine. For the offset and gain there are two separate
capacitors, one of which is trimmed when an offset or gain
calibration is performed. Again, it is the ratio of these capacitors
to the capacitors in the DAC that is critical and the calibration
algorithm ensures that this ratio is at a specified value for both
the offset and gain calibrations.
The zero-scale error is adjusted for an offset calibration, and
the positive full-scale error is adjusted for a gain calibration.
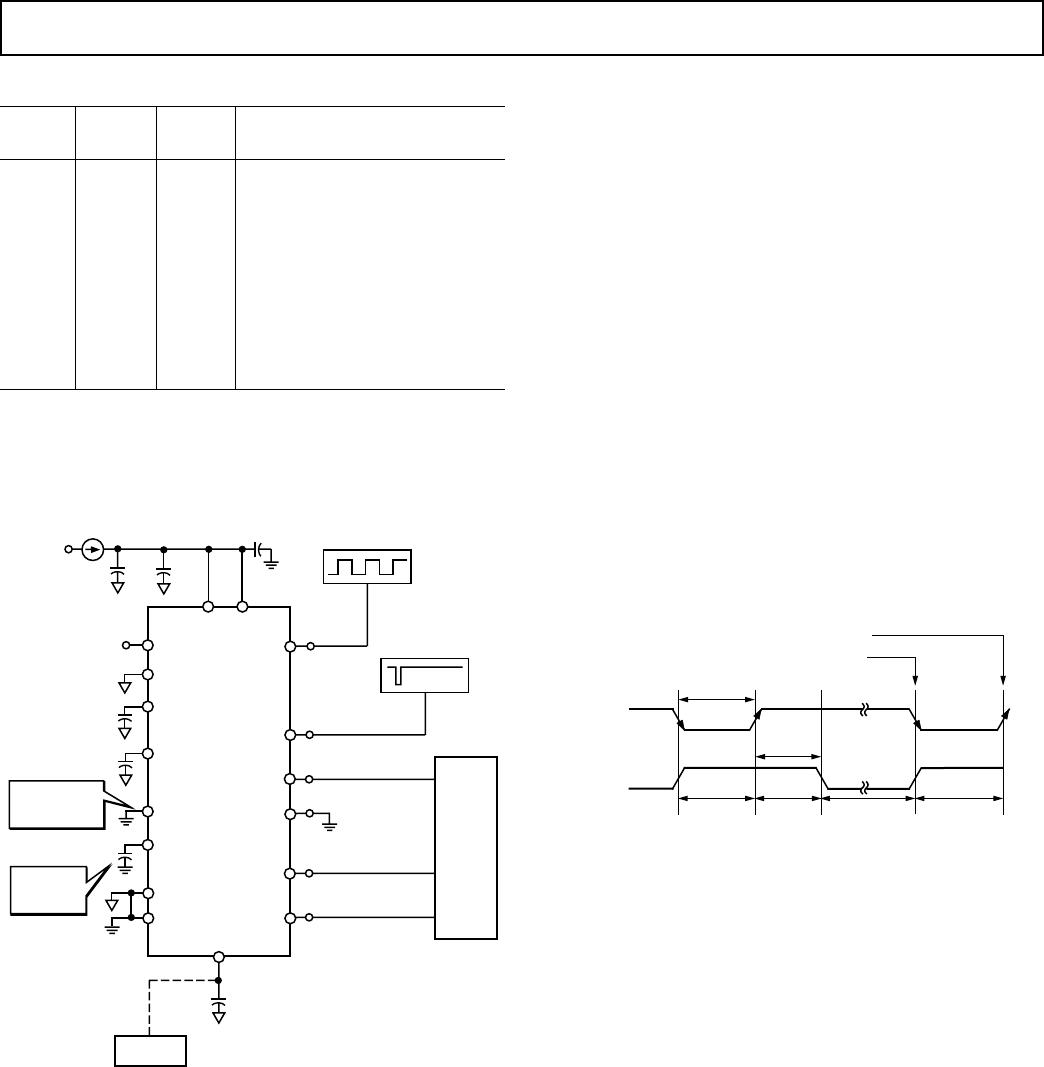
Self-Calibration Timing
The diagram of Figure 25 shows the timing for a full self-
calibration. Here the BUSY line stays high for the full length of
the self-calibration. A self-calibration is initiated by bringing the
CAL pin low (which initiates an internal reset) and then high
again or by writing to the control register and setting the STCAL
bit to 1 (note that if the part is in a power-down mode the CAL pulse-
width must take account of the power-up time ). The BUSY line is
triggered high from the rising edge of CAL (or the end of the
write to the control register if calibration is initiated in soft-
ware), and BUSY will go low when the full self-calibration is
complete after a time t
CAL
as shown in Figure 25.
For the self- (gain + offset), self-offset, and self-gain calibrations
the BUSY line will be triggered high by the rising edge of the
CAL signal (or the end of the write to the control register if
calibration is initiated in software) and will stay high for the
full duration of the self-calibration. The length of time that
the BUSY is high will depend on the type of self-calibration
that is initiated. Typical figures are given in Table VIII. The
timing diagrams for the other self-calibration options will be
similar to that outlined in Figure 25.
t
1
= 100ns MIN,
t
15
= 2.5
t
CLKIN
MAX,
t
CAL
= 125013
t
CLKIN
t
1
t
15
t
CAL
BUSY (O/P)
CAL (I/P)
Figure 25. Timing Diagram for Full Self-Calibration
System Calibration Description
System calibration allows the user to take out system errors
external to the AD7858/AD7858L as well as calibrate the errors
of the AD7858/AD7858L itself. The maximum calibration
range for the system offset errors is ±5% of V
REF
and for the
system gain errors is ±2.5% of V
REF
. This means that the maxi-
mum allowable system offset voltage applied between the
AIN(+) and AIN() pins for the calibration to adjust out this
error is ±0.05 × V
REF
(i.e., the AIN(+) can be 0.05
×
V
REF
above
AIN(–) or 0.05
×
V
REF
below AIN(–)). For the System gain error
the maximum allowable system full-scale voltage that can be
applied between AIN(+) and AIN() for the calibration to
adjust out this error is V
REF
± 0.025
×
V
REF
( i.e., the AIN(+)
above AIN(–)). If the system offset or system gain errors are
outside the ranges mentioned the system calibration algorithm
will reduce the errors as much as the trim range allows.
Figures 26 through 28 illustrate why a specific type of system
calibration might be used. Figure 26 shows a system offset
calibration (assuming a positive offset) where the analog input
range has been shifted upwards by the system offset after the
system offset calibration is completed. A negative offset may
also be accounted for by a system offset calibration.
MAX SYSTEM OFFSET
IS 5% OF V
REF
V
REF
1LSB
SYS OFFSET
AGND
ANALOG
INPUT
RANGE
MAX SYSTEM FULL SCALE
IS 2.5% FROM V
REF
SYSTEM OFFSET
CALIBRATION
MAX SYSTEM OFFSET
IS 5% OF V
REF
SYS OFFSET
AGND
V
REF
+ SYS OFFSET
V
REF
1LSB
ANALOG
INPUT
RANGE
Figure 26. System Offset Calibration

AD7858LARZ

Mfr. #:
Manufacturer:
Analog Devices Inc.
Description:
Analog to Digital Converters - ADC 3-5V SGL Supply 200kSPS 8-Ch 12-Bit
Lifecycle:
New from this manufacturer.
Delivery:
DHL FedEx Ups TNT EMS
Payment:
T/T Paypal Visa MoneyGram Western Union