LTC2921/LTC2922 Series
10
29212fa
The timing of a circuit breaker trip and reset, and a
subsequent regular turn-on are shown in Figure 4. Prior to
time 1, a successful turn-on sequence had completed. At
time 1, excessive current pulls SENSE more than 50mV
below V
CC
. The GATE pin, PG pin, and the remote sense
switches fall at rates determined by the pull-down currents
and loading conditions of each (times 2, 3, 4). Note that the
excessive current condition ceases at time 4. A circuit
breaker reset pulse is initiated at time 5. The latch resets
at time 6 since the V1 pulse is wide enough. A normal turn-
on begins when V1 rises above the monitor threshold
(time 7 onward).
Multiple supply systems have become common to accom-
modate circuits on the same board with different voltage
requirements. Desktop PC motherboards, instrumenta-
tion circuits and plug-in boards of all kinds often require
tracking and control of several supply voltages.
The LTC2921 and LTC2922 ramp and monitor up to five
supply voltages in such systems. External resistive volt-
age dividers independently program four monitor levels,
while an internal divider sets the V
CC
pin supply monitor
level. Time delays in the monitoring sequence are set by an
external capacitor at the TIMER pin.
The GATE pin provides a high side drive voltage appropri-
ate to logic-level and sublogic-level N-channel power
TI I G DIAGRA S
WUW
V1
V2
V3
V4
0.7V
0.5V
0.7V
0.5V
0.7V
0.5V
0.7V
0.5V
V
CC
V
CC
V
CC
-50mV
V
CC
V
CC
-50mV
1.2V 1.2V
1234 675
V
CC
SENSE
TIMER
GATE
PG
REMOTE
SENSE
SWITCH
GATE
INTERNAL
CIRCUIT
BREAKER
LATCH
UNDERVOLTAGE
LOCKOUT LEVEL
APPLICATIO S I FOR ATIO
WUUU
Figure 4. Circuit Breaker Trip, Reset and Start-Up Sequence Timing
MOSFETs. The external RC network on GATE programs
the supply ramp rate and eliminates possible high fre-
quency oscillations in the power path. Featured in the
LTC2921/LTC2922 series are sub-10 internal remote
sense switches to compensate for voltage drops between
the supplies and the loads.
At the end of a successful power-on sequence, the LTC2921/
LTC2922 asserts the PG output. A typical application uses
an external pull-up resistor between PG and the load side
of a supply. In applications where supply power-on se-
quencing is required, the PG pin can function as a second,
separate high side driver.
LTC2921/LTC2922 Series
11
29212fa
APPLICATIO S I FOR ATIO
WUU
U
Figure 5. Basic Monitor Connection
Setting the Supply Monitor Levels
The LTC2921 and LTC2922 series both feature low 0.5V
monitoring thresholds with tight 1% accuracy. To set a
supply monitoring level tightly, design a precision ratio
resistive divider to relate the lowest valid supply voltage to
the maximum specified monitor threshold voltage. Use
resistors with 1% tolerance or better to limit the error due
to mismatch. The basic resistive divider connection for
supply monitoring is shown in Figure 5.
2921/22 F05
LTC2922
V1
GND
GATE
V
Q1
Q1
C
GATE
LOAD
I
MON
I
A1
R
B1
R
Y1
R
Z1
R
A1
V
L1
V
V1
V
SRC1
R
G1
10
V
OUT
V
FB
GND
DC/DC
CONVERTER
+–
±0.1µA
First, divide the nominal monitor threshold voltage by an
acceptable bias current (I
A1
), and choose a nearby stan-
dard value for resistor R
A1
(see Equation 1).
Next, calculate the bounds on the value of R
B1
that
guarantee that the divided minimum supply voltage ex-
ceeds the maximum specified monitor threshold voltage,
and that the minimum specified overvoltage threshold
exceeds the divided maximum supply voltage. Use Equa-
tions 2 and 3 to calculate R
B1(MAX)
and R
B1(MIN)
from R
A1
,
the resistor tolerance (RTOL), the supply voltage, the
monitor threshold and overvoltage specifications, and the
monitor pin leakage current specification.
When the integrated remote sensing switch is closed, the
DC/DC converter will compensate for the IR drop from
drain to source of the external N-channel FET (V
Q1(ON)
) by
increasing the supply voltage by the same amount. Calcu-
late with V
Q1(ON)(MAX)
= 0V if the remote sense switch is
not used.
R
V
I
A
A
1
1
0 500
=
.
(1)
R
R
RTOL
RTOL
VV
VAR
B MAX
A
SRC MIN
A
1
1
1
1
1
1
0 505
0 505 0 1
()
()
–.
..
=
+
(2)
RR
RTOL
RTOL
VV V
VAR
B MIN A
SRC MAX Q ON MAX
A
11
11
1
1
1
0 665
0 665 0 1
()
() ()()
–.
.–.
=
+
+
µ
(3)
Choose a standard resistor value for R
B1
that satisfies the
inequality of Equation 4.
R
B1(MIN)
R
B1
R
B1(MAX)
(4)
When several standard values meet the requirement,
choose the value closest to R
B1(MAX)
to set the tightest
monitor threshold. This also allows more headroom for
larger V
Q1(ON)(MAX)
. Alternatively, choose the standard
value closest to R
B1(MIN)
to set the tightest overvoltage
threshold.
All four monitor input voltages must be between the
monitor threshold and the overvoltage threshold for the
turn-on sequence to begin. Connect unneeded monitor
input pins to any of the utilized monitor input pins.
Selecting the External N-Channel MOSFETs
The GATE pin drives the gate of external N-channel
MOSFETs above V
CC
to connect the supplies to the loads.
The GATE drive voltage provided by the LTC2921/LTC2922
series is best suited to logic-level and sublogic-level
power MOSFETs. To achieve the lowest switch resistance,
the V
CC
pin must be connected to the highest supply
voltage.
Consider the application requirements for current, turnoff
speed, on-resistance, gate-source voltage specification,
etc. Refer to the Electrical Specifications and Typical
Performance Curves to determine the GATE voltages for
given V
CC
voltages over the required range of conditions.
Calculate the minimum gate drive voltage for each moni-
tored supply for use in selecting the FETs. Check the
maximum GATE voltage against the FETs’ gate-source
LTC2921/LTC2922 Series
12
29212fa
voltage specifications. On-resistance is a critical param-
eter when choosing power MOSFETs. The integrated
remote sense switches compensate for IR drops, but
minimizing V
Q(MAX)
leaves more margin for designing the
resistive voltage divider for the monitors.
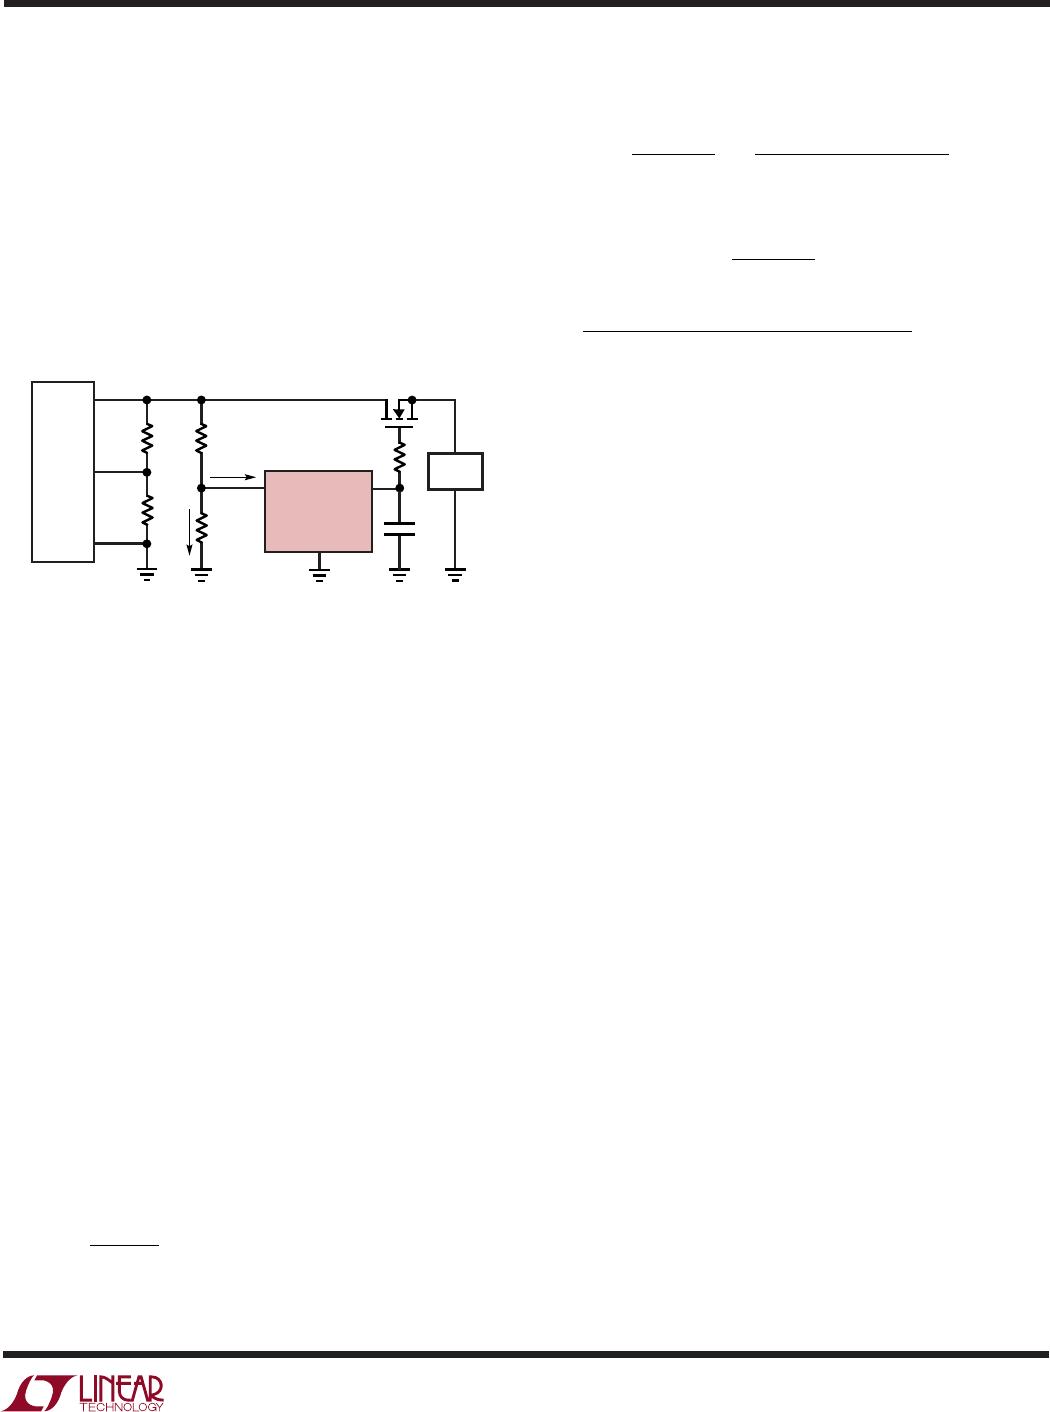
Setting the GATE Ramp Rate
Application of power to the loads is controlled by setting
the voltage ramping rate with an external capacitor on the
GATE pin. During Step 3 of the monitoring sequence, a
10µA pull-up ramps the GATE pin capacitance up to
V
PUMP
, the internal charge pump voltage. Use Equation 5
to calculate the nominal GATE pin capacitance necessary
to achieve a given ramp rate, V/t:
C
A
Vt
GATE
=
µ
∆∆
10
/
(5)
Alternatively, to calculate the GATE capacitor to achieve a
desired nominal ramp time, use Equation 6. The GATE
drive voltage (V
GATE
) varies with V
CC
voltage. Consult the
Electrical Characteristics table and Typical Performance
curves to choose an appropriate value to insert for V
GATE
.
C
At
V
GATE
RAMP
GATE
=
µ10
(6)
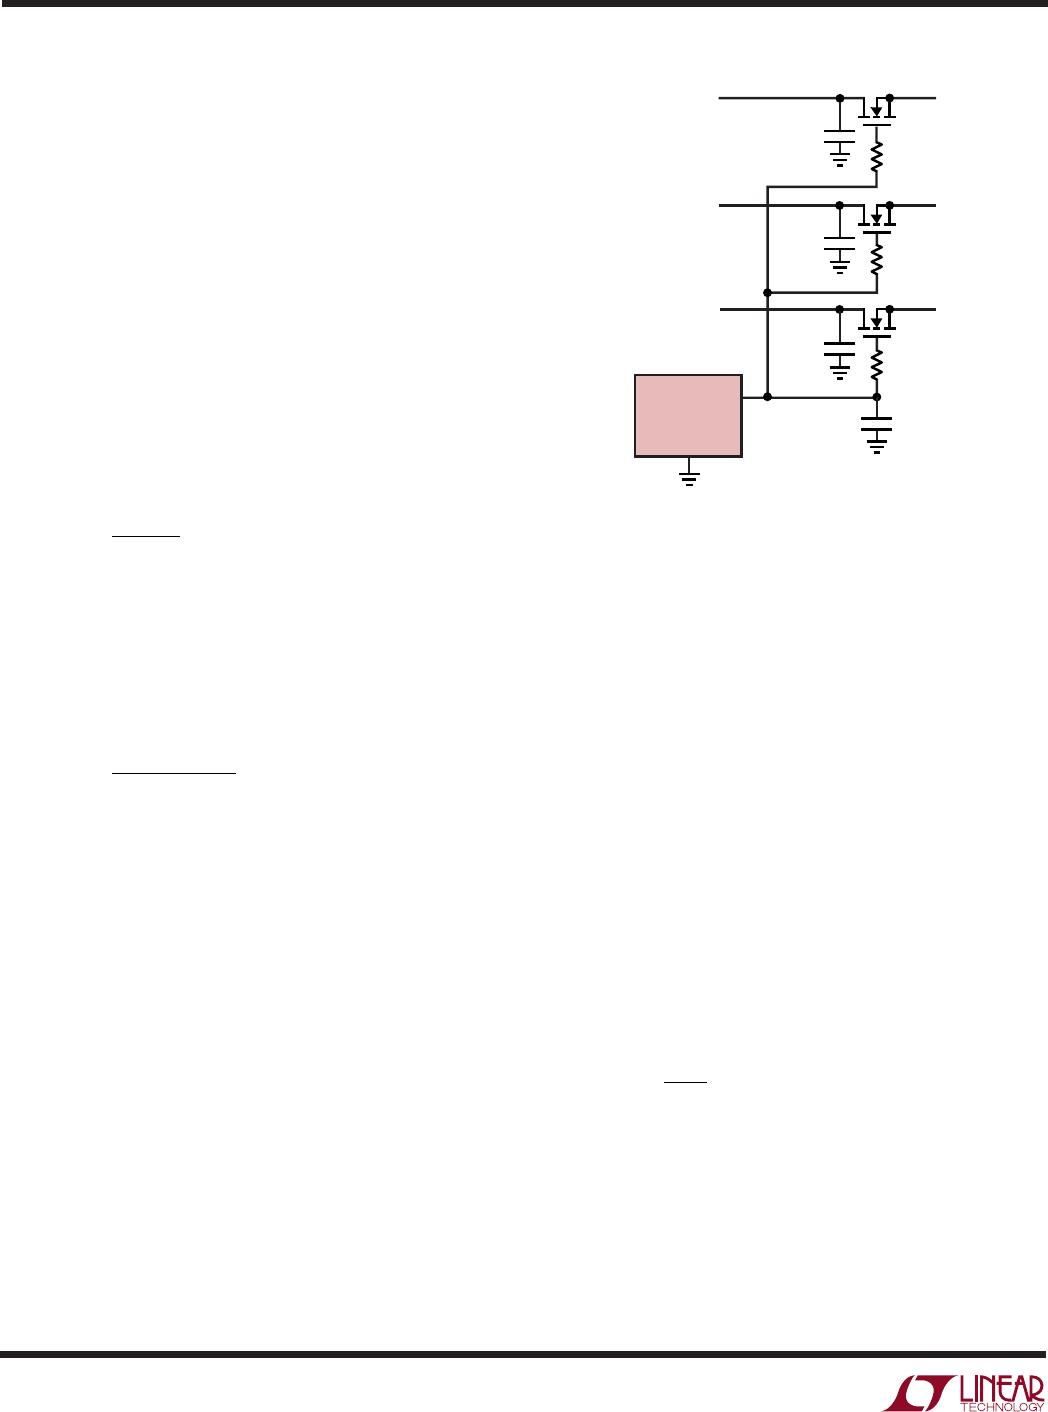
When the GATE pin drives several FETs in parallel, the load
voltages ramp together at the same rate until the lowest
supply reaches its full value. The other supplies continue
to track until the next lowest supply reaches its full value,
and so on.
The GATE pin must not be forced above the level it reaches
when fully ramped. An internal clamp limits the GATE
voltage to 12.2V relative to ground.
Damp possible ramp-on oscillations by including a 10
resistor in series with each external N-channel gate, and as
necessary, a 0.1µF capacitor on each external N-channel
drain, as shown in Figure 6.
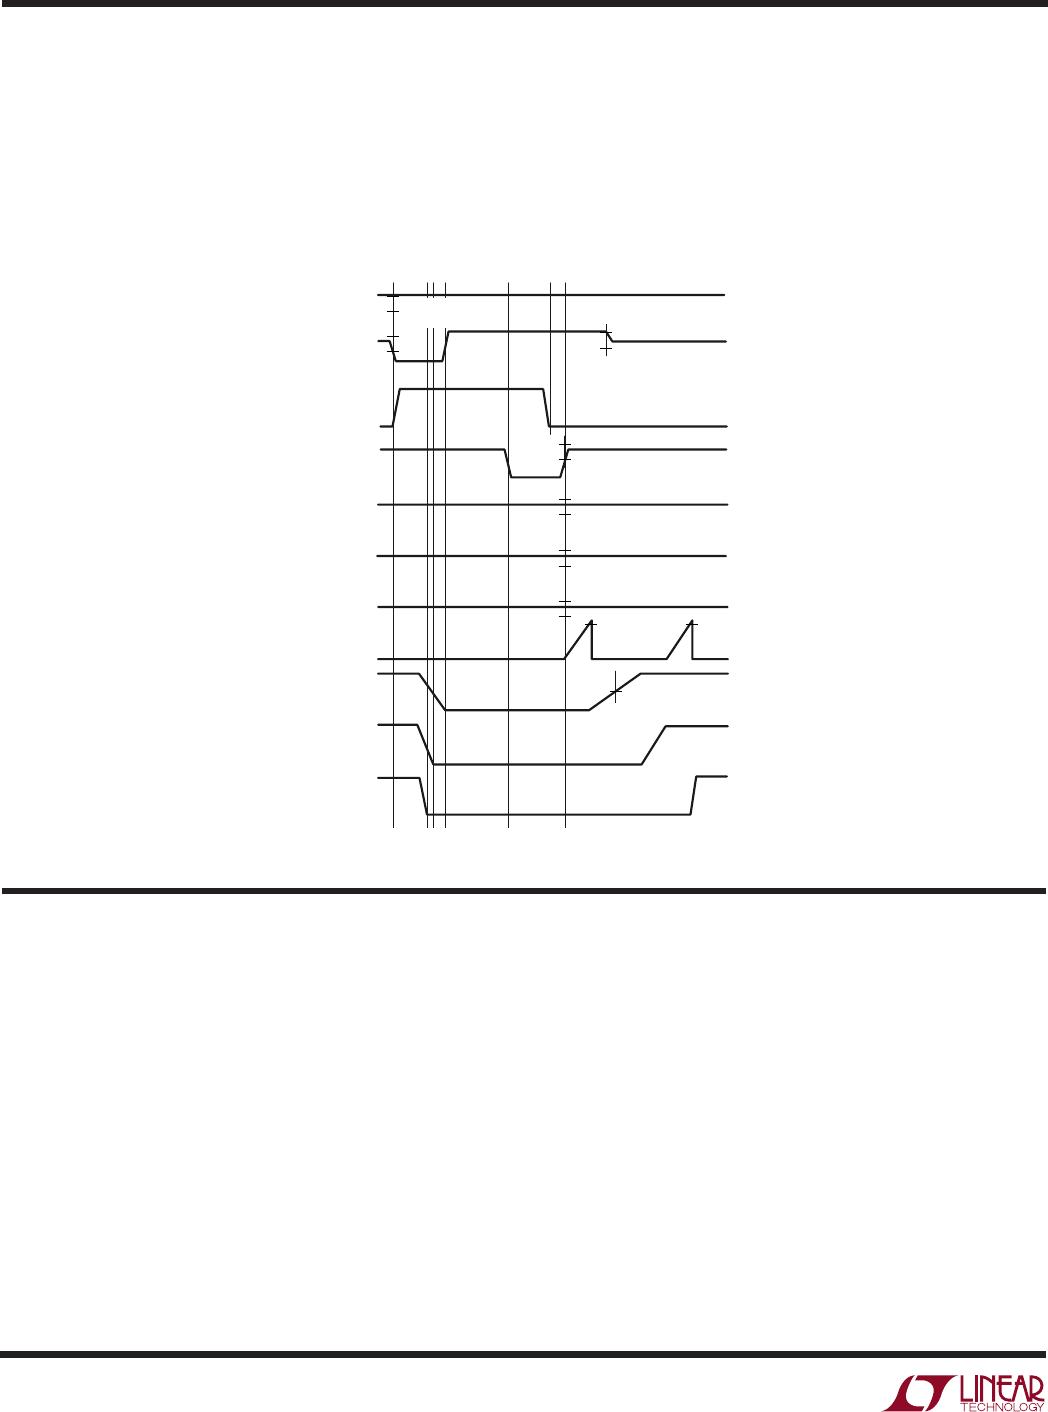
Setting the Sequence Delay Timer
The turn-on sequence includes two programmable delays
set by the capacitance on the TIMER pin. More precisely,
a single delay value is used at two points in the sequence.
APPLICATIO S I FOR ATIO
WUUU
In both cases, the delay provides a measure of confidence
that conditions are stable enough for the sequence to
advance.
The first TIMER delay begins once all monitor voltages
comply with their thresholds, the electronic circuit breaker
has not tripped, and V
CC
is not undervoltage. The TIMER
pin sources 2µA into an external capacitor, which ramps
its voltage. A comparator trips when the TIMER pin voltage
reaches the internal 1.2V reference, then the GATE ramp
begins, and TIMER is pulled to ground. The second TIMER
delay begins after the gate of the remote sense switches is
fully ramped up. After the TIMER ramp completes, the PG
pin is activated. An internal circuit pulls-down the TIMER
pin with >100µA of current at all times, except during the
ramping periods, and when V
CC
is undervoltage.
Calculate the nominal value for the timing capacitor by
inserting the desired delay into Equation 7:
C
A
V
t
TIMER DLY
=
µ2
12.
(7)
For delay times below 60µs, be sure to limit stray capaci-
tances on the TIMER pin by using good PCB design
practices. To program essentially no delay (<1µs), float
the TIMER pin.
Internal circuitry guarantees that the TIMER pin is pulled
below 150mV (typical) before a delay cycle can begin.
LTC2922
GND
GATE
R
G2
10
R
G1
10
R
G0
10
Q2
Q1
Q0
C
GATE
C
D2
0.1µF
(OPT)
C
D1
0.1µF
(OPT)
C
D0
0.1µF
(OPT)
V
SRC2
V
SRC1
V
SRC0
2921/22 F06
V
L2
V
L1
V
L0
Figure 6. Ramping and Damping Components on GATE Pin

LTC2921CGN-3.3#TRPBF

Mfr. #:
Manufacturer:
Analog Devices Inc.
Description:
Current & Power Monitors & Regulators Power Supply Tracker w/3 FB Switches
Lifecycle:
New from this manufacturer.
Delivery:
DHL FedEx Ups TNT EMS
Payment:
T/T Paypal Visa MoneyGram Western Union