REVISION D 07/13/15 25 PROGRAMMABLE FANOUT BUFFER
5P1103 DATASHEET
Termination for 3.3V LVPECL Outputs
The clock layout topology shown below is a typical termination
for LVPECL outputs. The two different layouts mentioned are
recommended only as guidelines.
The differential outputs generate ECL/LVPECL compatible
outputs. Therefore, terminating resistors (DC current path to
ground) or current sources must be used for functionality.
These outputs are designed to drive 50
transmission lines.
Matched impedance techniques should be used to maximize
operating frequency and minimize signal distortion. The figure
below
show two different layouts which are recommended
only as guidelines. Other suitable clock layouts may exist and
it would be recommended that the board designers simulate
to guarantee compatibility across all printed circuit and clock
component process variations.
3.3V LVPECL Output Termination (1)
3.3V LVPECL Output Termination (2)
LVPECL
Zo=50ohm
Zo=50ohm
3.3V
R1 R2
3.3V
50ohm
50ohm
RTT
50ohm
Input
+
-
LVPECL
Zo=50ohm
Zo=50ohm
3.3V
+
-
Input
R1 R2
3.3V
84ohm
84ohm
3.3V
R3 R4
125ohm
125ohm
PROGRAMMABLE FANOUT BUFFER 26 REVISION D 07/13/15
5P1103 DATASHEET
Termination for 2.5V LVPECL Outputs
Figures 2.5V LVPECL Driver Termination Example (1) and (2)
show examples of termination for 2.5V LVPECL driver. These
terminations are equivalent to terminating 50
to V
DDO
– 2V.
For V
DDO
= 2.5V, the V
DDO
– 2V is very close to ground level.
The R3 in Figure
2.5V LVPECL Driver Termination Example
(3)
can be eliminated and the termination is shown in example
(2).
2.5V LVPECL Driver Termination Example (1)
2.5V LVPECL Driver Termination Example (2)
2.5V LVPECL Driver Termination Example (3)
2.5V LVPECL
Driver
Zo=50ohm
Zo=50ohm
2.5V
+
-
R2 R4
V
DDO
= 2.5V
62.5ohm
62.5ohm
2.5V
R1 R3
250ohm
250ohm
2.5V LVPECL
Driver
Zo=50ohm
Zo=50ohm
2.5V
+
-
R1 R2
V
DDO
= 2.5V
50ohm
50ohm
2.5V LVPECL
Driver
Zo=50ohm
Zo=50ohm
2.5V
+
-
R1 R2
V
DDO
= 2.5V
50ohm
50ohm
R3
18ohm
REVISION D 07/13/15 27 PROGRAMMABLE FANOUT BUFFER
5P1103 DATASHEET
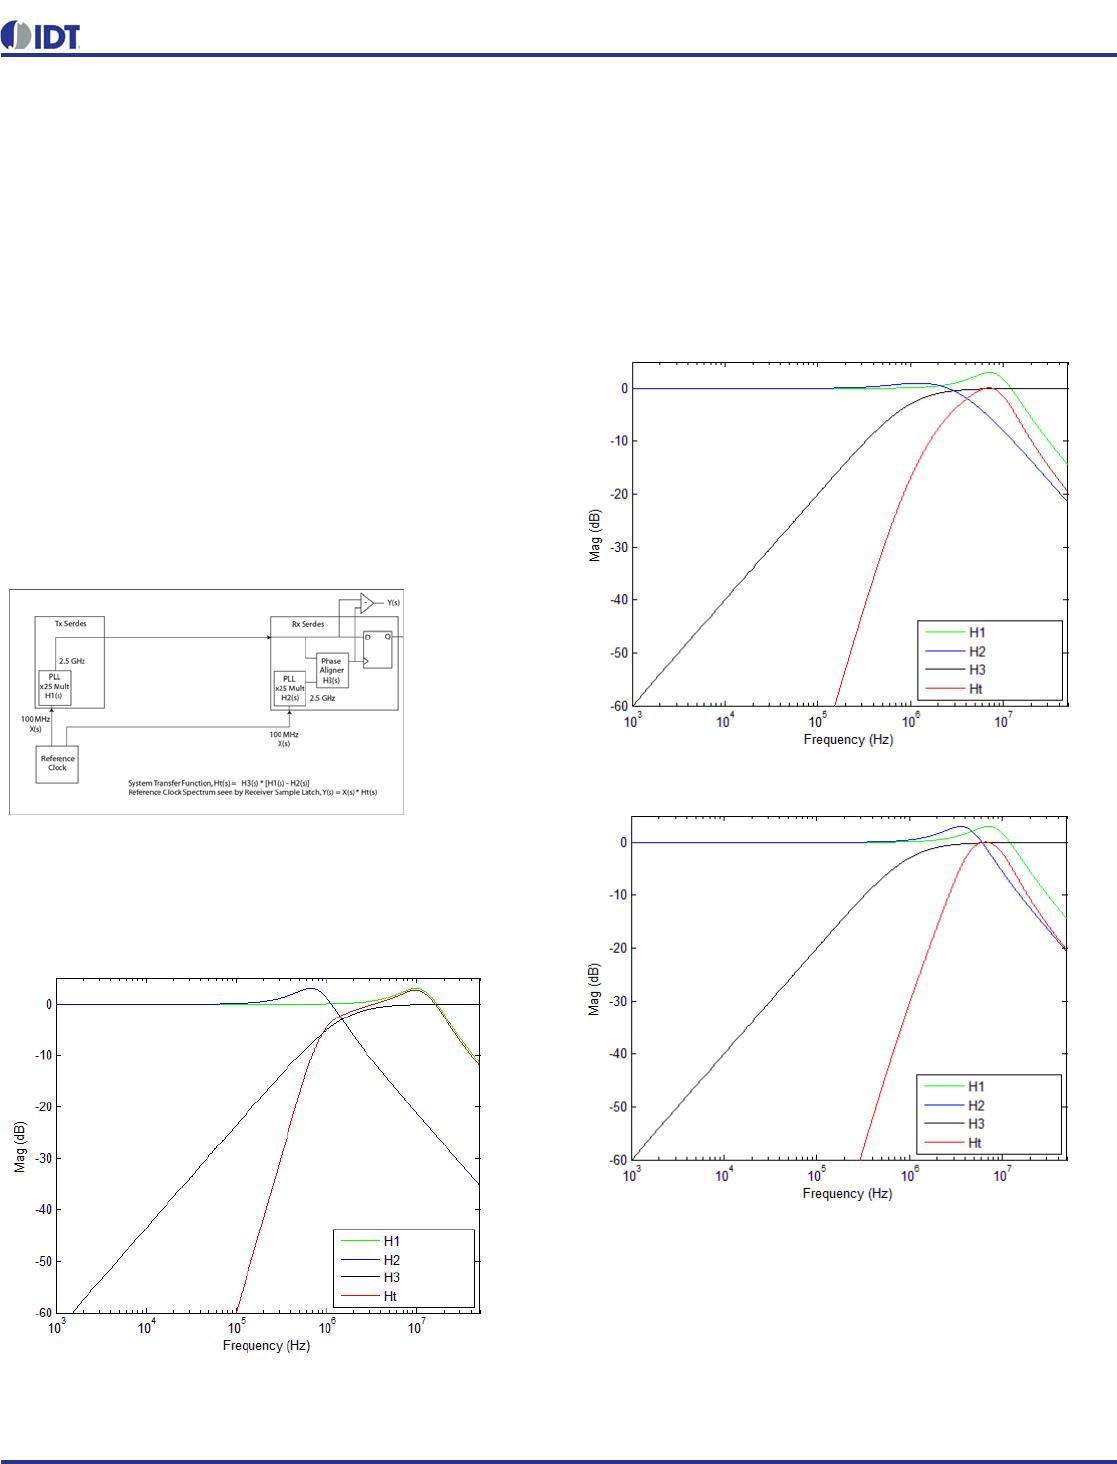
PCI Express Application Note
PCI Express jitter analysis methodology models the system
response to reference clock jitter. The block diagram below
shows the most frequently used Common Clock Architecture
in which a copy of the reference clock is provided to both ends
of the PCI Express Link. In the jitter analysis, the transmit (Tx)
and receive (Rx) serdes PLLs are modeled as well as the
phase interpolator in the receiver. These transfer functions are
called H1, H2, and H3 respectively. The overall system
transfer function at the receiver is:
The jitter spectrum seen by the receiver is the result of
applying this system transfer function to the clock spectrum
X(s) and is:
In order to generate time domain jitter numbers, an inverse
Fourier Transform is performed on X(s)*H3(s) * [H1(s) -
H2(s)].
PCI Express Common Clock Architecture
For PCI Express Gen 1, one transfer function is defined and the
evaluation is performed over the entire spectrum: DC to Nyquist (e.g
for a 100MHz reference clock: 0Hz – 50MHz) and the jitter result is
reported in peak-peak.
PCIe Gen1 Magnitude of Transfer Function
For PCI Express Gen2, two transfer functions are defined with
2 evaluation ranges and the final jitter number is reported in
RMS. The two evaluation ranges for PCI Express Gen 2 are
10kHz – 1.5MHz (Low Band) and 1.5MHz – Nyquist (High
Band). The plots show the individual transfer functions as well
as the overall transfer function Ht.
PCIe Gen2A Magnitude of Transfer Function
PCIe Gen2B Magnitude of Transfer Function
For PCI Express Gen 3, one transfer function is defined and
the evaluation is performed over the entire spectrum. The
transfer function parameters are different from Gen 1 and the
jitter result is reported in RMS.
Ht s H3 s H1 s H2 s=
Ys Xs H3 s H1 s H2 s=

5P1103A000NLGI

Mfr. #:
Manufacturer:
IDT
Description:
Clock Buffer 2 to 4 Output OTP 1.8 to 3.3V Prog Out
Lifecycle:
New from this manufacturer.
Delivery:
DHL FedEx Ups TNT EMS
Payment:
T/T Paypal Visa MoneyGram Western Union

Products related to this Datasheet